Tag Archive for ubuntu

ConBee 2 firmware upgrade on Ubuntu

Requirements:

Installed Deconz software. Downloadable, here: http://deconz.dresden-elektronik.de/ubuntu/stable/

Download the lates firmware from here:

http://deconz.dresden-elektronik.de/deconz-firmware/?C=M;O=D
(deCONZ_ConBeeII_0x)

Stop all services:

$ sudo systemctl stop deconz && sudo systemctl stop deconz-gui

Stop ModemManager if it is installed:

$ sudo systemctl stop ModemManager

Update the firmware:

sudo GCFFlasher_internal -t 60 -d /dev/ttyACM0 -f <LOCATION_OF_THE FIRMWARE_IMG>/deCONZ_ConBeeII_0x1234567.bin.GCF

src: https://github.com/dresden-elektronik/deconz-rest-plugin/wiki/Update-deCONZ-manually

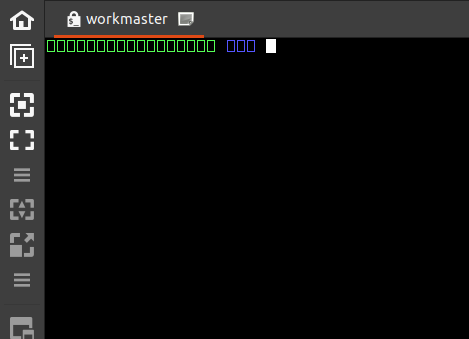
Unuable Remmina with squares as characters

I use Ubuntu 20.04 and sometime remmina makes me a joke….

If you start remmina, and you see like this:

remmina uses squares like on that pics

Try this:

rm -rf ~/.cache/fontconfig && sudo fc-cache -r -v

Acutally, it resolves me the problem.

Move “Show Applications” right to left of the Dock in Ubuntu

When I installed new Ubuntu 18.04, first thing I have my mind is to move the Dock at botton. I was very happy to see that Ubuntu 18.04 is already provided that option, to enable this you need to go to setting > Dock and then “Position of screen” to bottom.

Yessss, it works.

Image for post

After this one more thing I noticed is “Show applications” is showing at the right side of the Dock but I like it on the left (Event in old versions and mac/ windows its in left). I tried to search in google but nothing found so I thought of writing a notes about it. And finally, I got it working so I thought it will be good to share it with everyone.

Here is the command you need to run for this

gsettings set org.gnome.shell.extensions.dash-to-dock show-apps-at-top true

Yayyy, its working.

1*AbDjQvjx30Du4QBoNrHegg.png (700×31)

And of course, to back set it false:

gsettings set org.gnome.shell.extensions.dash-to-dock show-apps-at-top false

src: https://medium.com/@suneel.omrey/move-show-applications-right-to-left-of-the-dock-in-ubuntu-18-04-9592dfd18c9a

Oracle 11g XE install on Ubuntu 14/16

After Ubuntu downloaded and installed.

First install Java:

sudo add-apt-repository ppa:webupd8team/java

sudo apt-get update

sudo apt-get install oracle-java8-installer

Set JAVA_HOME

sudo nano /etc/bash.bashrc
export JAVA_HOME=/usr/lib/jvm/java-8-oracle
export PATH=$JAVA_HOME/bin:$PATH

Reload sources:

source /etc/bash.bashrc

Check:

echo $JAVA_HOME

result should be:

/usr/lib/jvm/java-8-oracle

Second: Download and prepare Oracle DB

Copy the downloaded file and paste it in home directory.

Unzip using the command:
unzip oracle-xe-11.2.0-1.0.x86_64.rpm.zip 

Install required packages using the command:

sudo apt-get install alien libaio1 unixodbc

Enter into the Disk1 folder using command:

cd Disk1/

Convert RPM package format to DEB package format (that is used by Ubuntu) using the command:

sudo alien --scripts -d oracle-xe-11.2.0-1.0.x86_64.rpm

Create the required chkconfig script using the command:

sudo pico /sbin/chkconfig

The pico text editor is started and the commands are shown at the bottom of the screen. Now copy and paste the following into the file and save:

#!/bin/bash
# Oracle 11gR2 XE installer chkconfig hack for Ubuntu
file=/etc/init.d/oracle-xe
if [[ ! `tail -n1 $file | grep INIT` ]]; then
    echo >> $file
    echo '### BEGIN INIT INFO' >> $file
    echo '# Provides: OracleXE' >> $file
    echo '# Required-Start: $remote_fs $syslog' >> $file
    echo '# Required-Stop: $remote_fs $syslog' >> $file
    echo '# Default-Start: 2 3 4 5' >> $file
    echo '# Default-Stop: 0 1 6' >> $file
    echo '# Short-Description: Oracle 11g Express Edition' >> $file
    echo '### END INIT INFO' >> $file
fi
update-rc.d oracle-xe defaults 80 01

Change the permission of the chkconfig file using the command:

sudo chmod 755 /sbin/chkconfig  

Set kernel parameters. Oracle 11gR2 XE requires additional kernel parameters which you need to set using the command:

sudo pico /etc/sysctl.d/60-oracle.conf

Copy the following into the file and save:

# Oracle 11g XE kernel parameters 
fs.file-max=6815744  
net.ipv4.ip_local_port_range=9000 65000  
kernel.sem=250 32000 100 128 
kernel.shmmax=536870912 

Verify the change using the command:

sudo cat /etc/sysctl.d/60-oracle.conf 

You should see what you entered earlier. Now load the kernel parameters:

sudo service procps start

Verify the new parameters are loaded using:

sudo sysctl -q fs.file-max

You should see the file-max value that you entered earlier.

Set up /dev/shm mount point for Oracle. Create the following file using the command:

sudo pico /etc/rc2.d/S01shm_load

Copy the following into the file and save.

#!/bin/sh
case "$1" in
start)
    mkdir /var/lock/subsys 2>/dev/null
    touch /var/lock/subsys/listener
    rm /dev/shm 2>/dev/null
    mkdir /dev/shm 2>/dev/null
*)
    echo error
    exit 1
    ;;

esac

Change the permissions of the file using the command:

sudo chmod 755 /etc/rc2.d/S01shm_load

Now execute the following commands:

sudo ln -s /usr/bin/awk /bin/awk 
sudo mkdir /var/lock/subsys 
sudo touch /var/lock/subsys/listener

Install Oracle

Install the oracle DBMS using the command:

sudo dpkg --install oracle-xe_11.2.0-2_amd64.deb

Configure Oracle using the command:

sudo /etc/init.d/oracle-xe configure

Setup environment variables by editting your .bashrc file:

pico ~/.bashrc

Add the following lines to the end of the file:

export ORACLE_HOME=/u01/app/oracle/product/11.2.0/xe
export ORACLE_SID=XE
export NLS_LANG=`$ORACLE_HOME/bin/nls_lang.sh`
export ORACLE_BASE=/u01/app/oracle
export LD_LIBRARY_PATH=$ORACLE_HOME/lib:$LD_LIBRARY_PATH
export PATH=$ORACLE_HOME/bin:$PATH

Load the changes by executing your profile:

. ~/.bashrc

Start the Oracle 11gR2 XE:

sudo service oracle-xe start

Add user YOURUSERNAME to group dba using the command:

sudo usermod -a -G dba YOURUSERNAME


src: https://askubuntu.com/questions/566734/how-to-install-oracle-11gr2-on-ubuntu-14-04 and https://www.quora.com/How-can-I-install-Oracle-11g-in-Ubuntu-16-04LTS

Xbox IrDA Ubuntu 10.04 alá

Haven’t found any consistant instructions on how to do this so here it is. This is not my work it’s the combination of other threads I’ve come across that seemed to work for me.

  1. Blacklist xpad
    Code:
    sudo nano /etc/modprobe.d/blacklist.conf

    add:

    Code:
    blacklist xpad
  2. Install lirc – config menu will pop up. select none.
    Code:
    sudo apt-get install lirc
  3. Install lirc source modules
    Code:
    sudo apt-get install lirc-modules-source
  4. Configure hardware.conf
    Code:
    sudo nano /etc/lirc/hardware.conf

    replace all and add:

    Code:
    # /etc/lirc/hardware.conf
    #
    #Chosen Remote Control
    REMOTE="None"
    REMOTE_MODULES="lirc_atiusb lirc_dev"
    REMOTE_DRIVER=""
    REMOTE_DEVICE="/dev/lirc0"
    REMOTE_SOCKET=""
    REMOTE_LIRCD_CONF=""
    REMOTE_LIRCD_ARGS="-r"
    
    #Chosen IR Transmitter
    TRANSMITTER="None"
    TRANSMITTER_MODULES=""
    TRANSMITTER_DRIVER=""
    TRANSMITTER_DEVICE=""
    TRANSMITTER_SOCKET=""
    TRANSMITTER_LIRCD_CONF=""
    TRANSMITTER_LIRCD_ARGS=""
    
    #Enable lircd
    START_LIRCD="true"
    
    #Don't start lircmd even if there seems to be a good config file
    #START_LIRCMD="false"
    
    #Try to load appropriate kernel modules
    LOAD_MODULES="true"
    
    # Default configuration files for your hardware if any
    LIRCMD_CONF="lircd.conf"
    
    #Forcing noninteractive reconfiguration
    #If lirc is to be reconfigured by an external application
    #that doesn't have a debconf frontend available, the noninteractive
    #frontend can be invoked and set to parse REMOTE and TRANSMITTER
    #It will then populate all other variables without any user input
    #If you would like to configure lirc via standard methods, be sure
    #to leave this set to "false"
    FORCE_NONINTERACTIVE_RECONFIGURATION="true"
    START_LIRCMD=""
  5. configure lircd.conf
    Code:
    sudo nano /etc/lirc/lircd.conf

    replace and add:

    Code:
    # LIRCD configuration file for Xbox DVD Kit
    #
    # Marko Friedemann <mfr@bmx-chemnitz.de>
    #
    #
    # brand:             Microsoft
    # model:             Xbox DVD Remote
    # supported devices: Xbox DVD Remote via xpad-ir driver
    #
    # comment:           EXPERIMENTAL
    #
    begin remote
    
        name  XboxDVDDongle
        bits           8
    
        begin codes
    
            SELECT          0x0b
            UP              0xa6
            DOWN            0xa7
            RIGHT           0xa8
            LEFT            0xa9
            INFO            0xc3
    
            9               0xc6
            8               0xc7
            7               0xc8
            6               0xc9
            5               0xca
            4               0xcb
            3               0xcc
            2               0xcd
            1               0xce
            0               0xcf
    
            DISPLAY         0xd5
            BACK            0xd8
            SKIP+           0xdd
            SKIP-           0xdf
            STOP            0xe0
            REVERSE         0xe2
            FORWARD         0xe3
            TITLE           0xe5
            PAUSE           0xe6
            PLAY            0xea
            MENU            0xf7
    
          end codes
    
    end remote
  6. configure modules to load at startup
    Code:
    sudo nano /etc/modules

    add:

    Code:
    lirc_dev
    lirc_atiusb
  7. edit lirc_dev.h
    Code:
    sudo nano /usr/src/lirc-0.8.7/drivers/lirc_dev/lirc_dev.h

    change the line “#define LIRC_HAVE_KFIFO” to “#undef LIRC_HAVE_KFIFO”

  8. reconfigure lirc source modules
    Code:
    sudo dpkg-reconfigure lirc-modules-source
  9. reboot
  10. test
    Code:
    irw

    press a button on the remote.should see something like this:

    Code:
    00000000000000a7 00 DOWN XboxDVDDongle
    00000000000000a7 01 DOWN XboxDVDDongle
    00000000000000a7 00 DOWN_UP XboxDVDDongle
    00000000000000a7 00 DOWN XboxDVDDongle
    00000000000000a7 00 DOWN_UP XboxDVDDongle
    00000000000000a7 00 DOWN XboxDVDDongle
    00000000000000a7 00 DOWN_UP XboxDVDDongle
    00000000000000a9 00 LEFT XboxDVDDongle
    00000000000000a9 00 LEFT_UP XboxDVDDongle

    That it!

Wifi AP készítése

Procedure

apt-get install dhcp3-server hostapd

Modify /etc/hostapd/hostapd.conf and put the following

interface=wlan0
driver=nl80211
ssid=ronhks
hw_mode=g
channel=11
wpa=3
wpa_passphrase=<PASSWORD>
wpa_key_mgmt=WPA-PSK
wpa_pairwise=TKIP CCMP
wpa_ptk_rekey=600


The dhcpd.conf section in /etc/dhcp3/dhcpd.conf would have something like the following

subnet 10.10.0.0 netmask 255.255.255.0 {
        range 10.10.0.25 10.10.0.50;
        option domain-name-servers 8.8.4.4, 208.67.222.222;
        option routers 10.10.0.1;
}

Modify /etc/default/dhcp3-server

INTERFACES="wlan0"

Check what name your adapter got via iwconfig. You can change the name also and make it persistent via /etc/udev/rules.d/70-persistent-net.rules so that it always gets a single type of name. In our example we’re assuming wlan0, but it could be changed. Make necessary changes in your configuration too.

Configure the new interface

ifconfig wlan0 10.10.0.1

The above could also be done in a better way via the /etc/network/interfaces file, but didn’t try it out. In any case if you shutdown hostapd, the network interface (wlan0) loses its address, so need to put a script which assigns it again before hostapd is started. An example could be

iface wlan0 inet static
 address 10.10.0.1
 netmask 255.255.255.0

Restart the dhcp3-server. It should now be ready to serve addresses and is also bound to the network interface too.

Allow ip masquerading

echo "1" > /proc/sys/net/ipv4/ip_forward
iptables -t nat -A POSTROUTING -o eth0 -j MASQUERADE

Now start hostapd and see the messages that it shows

hostapd -dd /etc/hostapd/hostapd.conf

Wait for a few seconds, it should show some probes being done by other wifi devices. If it shows, then probably you’re in good luck.

Now try to connect via your device to this access point. It should work.

To make this work on boot, can put the relevant config in /etc/default/hostapd

RUN_DAEMON="yes"
DAEMON_CONF="/etc/hostapd/hostapd.conf"
DAEMON_OPTS="-dd"

and also put the firewall rules in /etc/rc.local (make sure its executable).

Remember – if you shutdown your hostapd, the network card would lose its address. So you have to assign that again before starting hostapd. The usual practice would be

  • Stop hostapd
  • Stop dhcp server
  • Restart network (or rather ifup wlan0 / ifconfig wlan0 10.10.0.1 would do)
  • Restart dhcp server
  • Start hostapd

Miscellaneous

  1. You can check the wifi interfaces via
    iwconfig
  2. To set a wifi adapter into master mode, try the following. If it doesn’t work and shows an error that it’s not possible or something, fret not – use hostapd as that’ll do that in any case.
    iwconfig wlan0 mode Master
  3. Network Manager could create issues, though in my test environment – instead of using an ethernet interface, I used two wlan interfaces, one being controlled by Network Manager for internet access, and other for making it an access point.
  4. modprobe -r ath5k / modprobe -r rt2800usb etc. is to be used for unloading the modules.
  5. If you wish to proceed without using authentication so that you can test it easy, then put the following in /etc/hostapd/hostapd.conf
    interface=wlan0
    driver=nl80211
    ssid=MyAP
    hw_mode=g
    channel=11